Authentication
This guide will walk you through setting up your first application and making your first token request.
Application Types
Regardless of what API functionality you are interested in using, you will need to create a new application within the Developer Console. You have the option to provision two main types of applications:
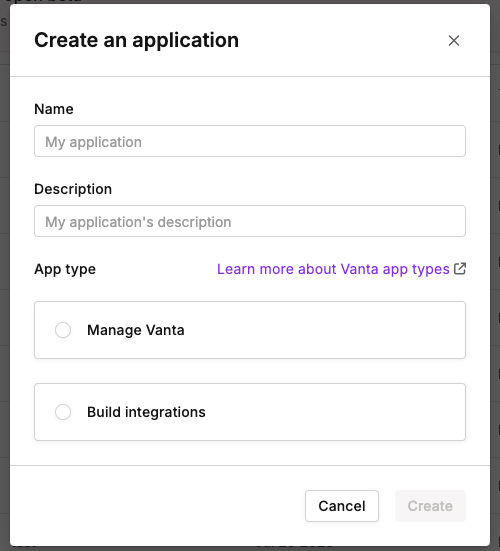
- Manage Vanta: choose this option to access all Vanta API functionality (excluding the creation of a new private or public integration).
- Build Integrations: choose this option if you want to create new public or private integrations to sync data from non-integrated environments into Vanta.
If you aren’t sure what type of application to create, read more about the different options on the Overview - API Capabilities page.
For Partners building a public integration, please refer to this page to get started!
For Auditors leveraging the audit endpoints, please refer to this page to get started!
Creating a new application
-
Login to Vanta and navigate to the "Settings" page > then "Developer Console" and then click "Create":
-
Give your application a name & description and then select the "App type" based on your use case:

-
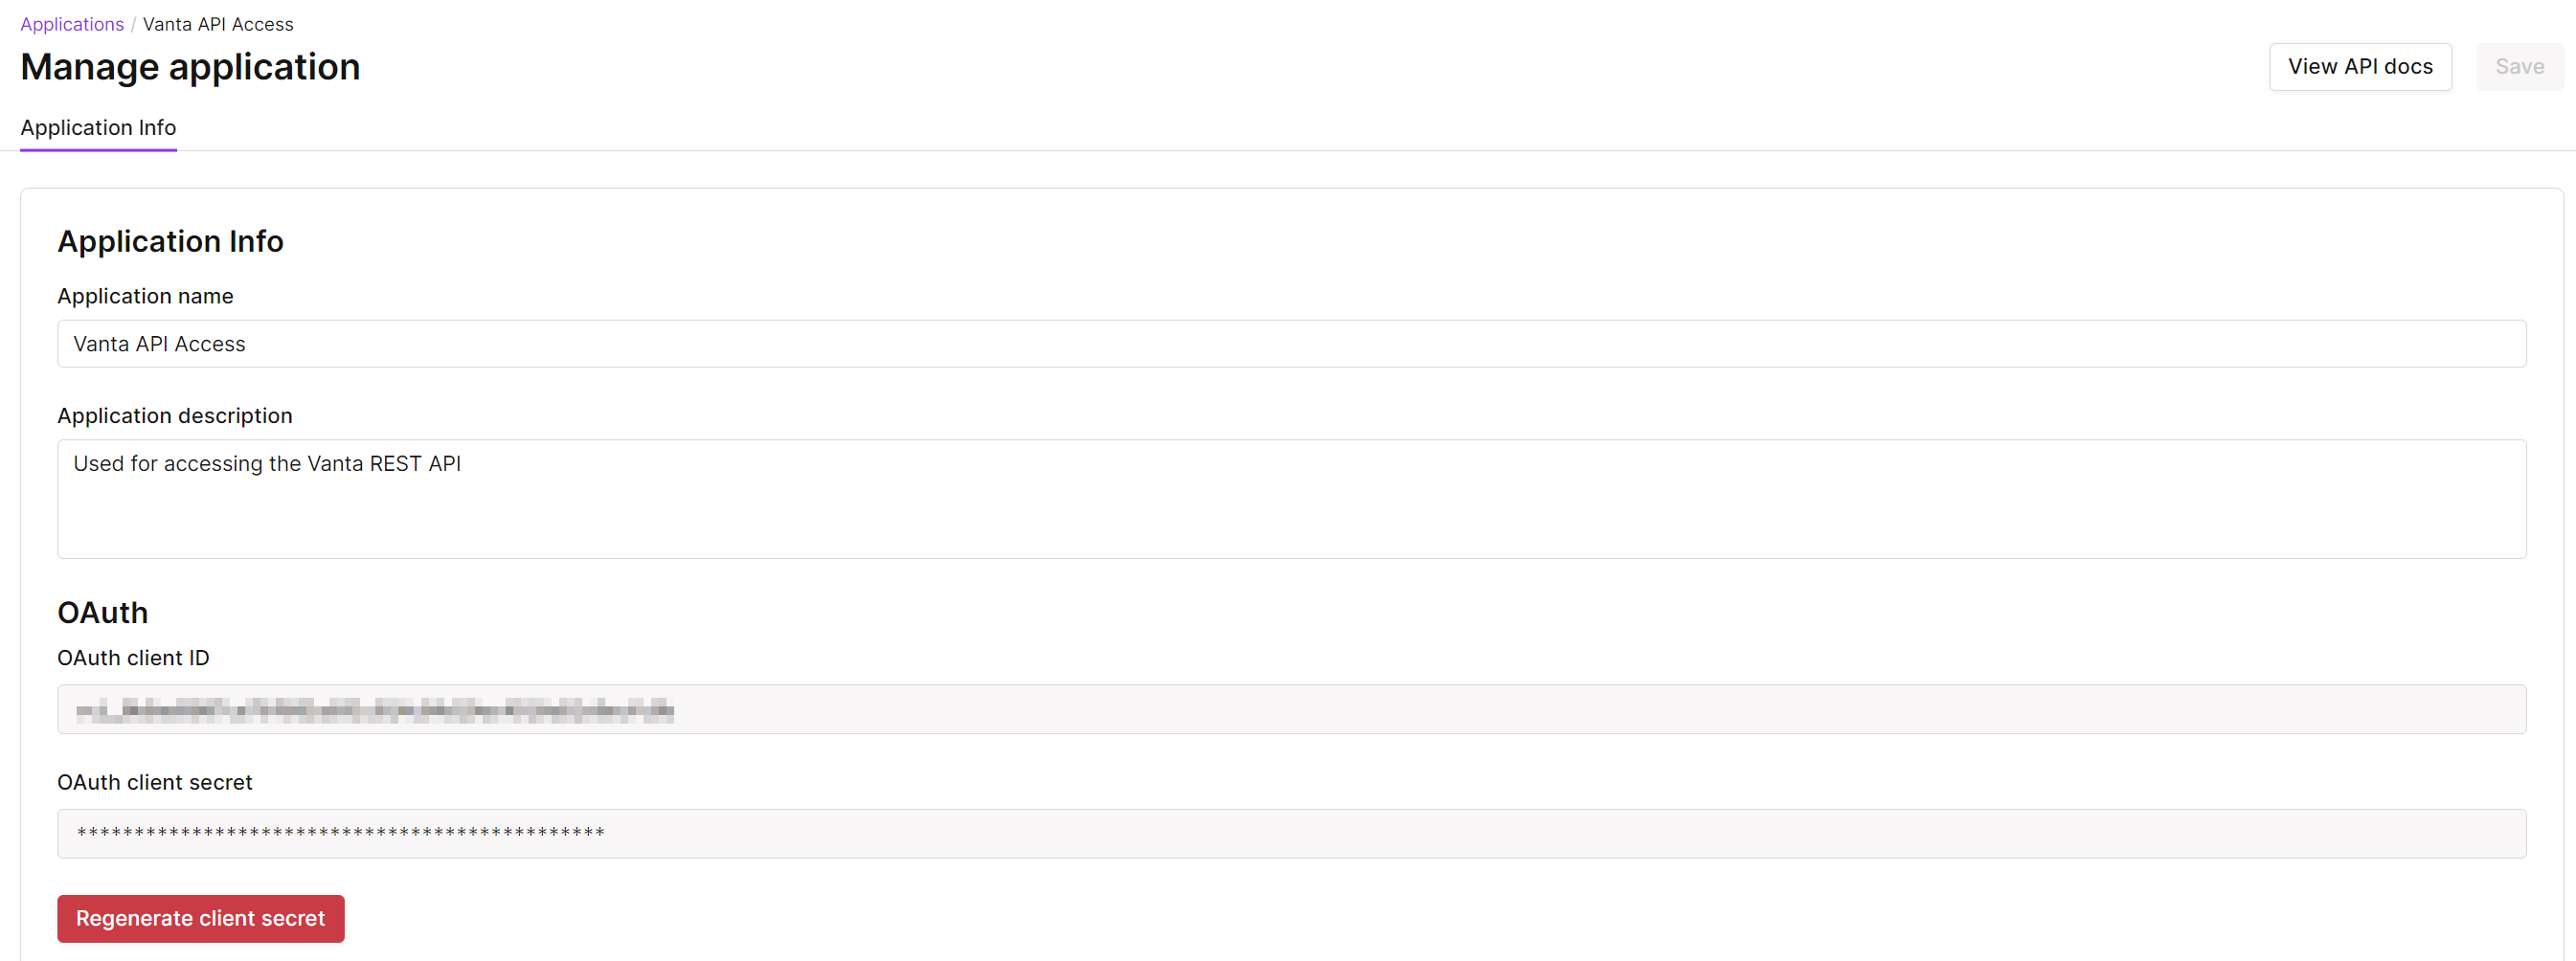
You will see the OAuth client ID was autogenerated for us. We will use this in Our First API Request! shortly. We now need to generate the OAuth client secret, so let's click on "Generate client secret".
Note: Only share these two values with trusted team members, as these can be used together to authenticate to the Vanta API. You can always regenerate a new client secret if you want to rotate credentials for security reasons.

Permission Scopes
Regardless of the Application type or API use case you require, you will always use the same authentication endpoint (https://api.vanta.com/oauth/token) to retrieve the token necessary to complete subsequent requests. However, you will want to define the token's scope based on the application type you created and the API endpoints/methods you want to make. As an example, if we chose "Manage Vanta" as our application type, we can use the following scopes:
- vanta-api.all:read
- vanta-api.all:write
But we would not be able to use the other scopes listed in the following table for this application type. If you attempt to request a scope for an application type that is not applicable, you will receive an "invalid_scope" error.
Here is a breakdown of the token scopes available today:
| Scope | Description | App Type Applicability |
|---|---|---|
| vanta-api.all:read | Allows this token to use GET methods against endpoints within the "Manage Vanta" section of endpoints here. | Manage Vanta |
| vanta-api.all:write | Allows this token to use PUT, PATCH. POST, and DELETE methods against endpoints within the "Manage Vanta" section of endpoints here. | Manage Vanta |
| vanta-api.documents:upload | Allows this token to use the document upload endpoint here | Manage Vanta |
| vanta-api.vendors:read | Allows this token to use GET methods against the Vendor sets of endpoints here. | Manage Vanta |
| vanta-api.vendors:write | Allows this token to use PUT, PATCH. POST, and DELETE methods against the Vendor sets of endpoints here. | Manage Vanta |
| connectors.self:read-resource | Allows this token to use GET methods against endpoints within the "Build Integrations" section of endpoints here. | Build Integrations |
| connectors.self:write-resource | Allows this token to use PUT, PATCH. POST, and DELETE methods against endpoints within the "Build Integrations" section of endpoints here. | Build Integrations |
| self:write-document | Allows this token to upload file based evidence on behalf of your customers. | Build Integrations |
| self:read-document | Allows this token to query file based evidence you previously uploaded. | Build Integrations |
| auditor-api.audit:read | Allows this token to use GET methods against the audit endpoints. | Conduct an audit |
| auditor-api.audit:write | Allows this token to use PUT, PATCH. POST, and DELETE methods against the audit endpoints. | Conduct an audit |
| auditor-api.auditor:read | Allows this token to use GET methods against the auditor endpoints. | Conduct an audit |
| auditor-api.auditor:write | Allows this token to use PUT, PATCH. POST, and DELETE methods against the auditor endpoints. | Conduct an audit |
Authentication and Token Retrieval
Important Notes on TokensSingle-Active-Token Behavior
Vanta currently only allows a single active
access_tokenper Application today.
- What happens when you request a second token?
- If a second
access_tokenis requested using the sameclient_idandclient_secret, the server issues a newaccess_tokenand immediately revokes the previous one.- Any in-flight requests using the old
access_tokenwill fail with a 401 error.- Why enforce a single active token?
- Security: Limits risk of token leakage.
- Simplicity: Easier to track and revoke tokens.
Token Expiration
- How long will an
access_tokenstay active?
- An
access_tokenstays active for one hour unless a new one is requested using the sameclient_idandclient_secret.
Now that we have our credentials prepared, the next step is to retrieve our API token with the proper permission scopes.
For this example, we will be using the Vanta REST API using the following details:
- POST to the endpoint https://api.vanta.com/oauth/token
- Header: Content-Type | application/json
- Body:
{
  "client_id": "your_client_id",
  "client_secret": "your_client_secret",
  "scope": "vanta-api.all:read vanta-api.all:write",
  "grant_type": "client_credentials"
}
Here is an example cURL (replace the client id and client_secret with the values you generated from previous steps):
curl --location 'https://api.vanta.com/oauth/token' \
--header 'Content-Type: application/json' \
--data '{
  "client_id": "your_client_id",
  "client_secret": "your_client_secret",
  "scope": "vanta-api.all:read vanta-api.all:write",
  "grant_type": "client_credentials"
}'
const myHeaders = new Headers();
myHeaders.append("Content-Type", "application/json");
const raw = JSON.stringify({
"client_id": "vci_TOKEN",
"client_secret": "vcs_f64356_TOKEN",
"scope": "vanta-api.all:read vanta-api.all:write",
"grant_type": "client_credentials"
});
const requestOptions = {
method: "POST",
headers: myHeaders,
body: raw,
redirect: "follow"
};
fetch("https://api.vanta.com/oauth/token", requestOptions)
.then((response) => response.text())
.then((result) => console.log(result))
.catch((error) => console.error(error));const axios = require('axios');
let data = JSON.stringify({
"client_id": "vci_TOKEN",
"client_secret": "vcs_f64356_TOKEN",
"scope": "vanta-api.all:read vanta-api.all:write",
"grant_type": "client_credentials"
});
let config = {
method: 'post',
maxBodyLength: Infinity,
url: 'https://api.vanta.com/oauth/token',
headers: {
'Content-Type': 'application/json'
},
data : data
};
axios.request(config)
.then((response) => {
console.log(JSON.stringify(response.data));
})
.catch((error) => {
console.log(error);
});
import requests
import json

url = "https://api.vanta.com/oauth/token"

payload = json.dumps({
  "client_id": "vci_TOKEN",
  "client_secret": "vcs_f64356_TOKEN",
  "scope": "vanta-api.all:read vanta-api.all:write",
  "grant_type": "client_credentials"
})
headers = {
  'Content-Type': 'application/json'
}

response = requests.request("POST", url, headers=headers, data=payload)

print(response.text)
The response should look like this (where your token is stored in the access_token property):
{
    "access_token": "vat_your_token",
    "expires_in": 3599,
    "token_type": "Bearer"
}
We can now use our freshly generated access_token to authenticate against other API endpoints!
Updated about 1 month ago
